Posts

Showing posts from September, 2024

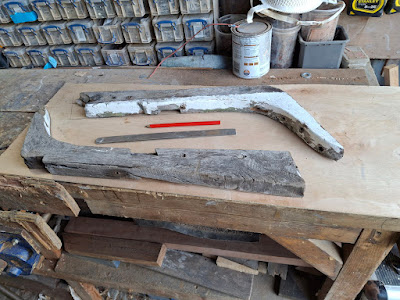
Starting to put the parts together for the port side frame.

Image
having cut all the ends of the section to the finished length and angle it is time to start putting the bevels on the two long sections The shorter section will have the bevels planed on to them once the sections are put together with paint and softwood pegs. The sections now laid on each other and now ready to marked up ready for the pegs to be driven through once they are ready. The bevels bevels put on the two long sections.  

Having thicknessed the new parts for the port side frame it is time to cut them down to the correct shape, also cut the lodging knees out of the piece left over and the oak stock for the new deck beams.

Image
Now that the frame stock has been thickenessed down to the finished width it is now time to cut the rough cut stock down to the finished shape to then start to shape the bevels on to the hull face of the new frame stock. The other job is to cut out the lodging knees out of the piece leftover from the frame stock and then thickness them down to their finished width. These will be put to one side until it is ready to refit the foredeck beams back in position once the beam shelf it reffixed in place. Here are the two fore deck beams that need replacing as one as rotted away at the ends and the other is broken in two places. these two deck beams are the two deck beams either side of the mast socket on the deck and they need to be very strong to support the pressure from the mast. The two lodging knee patterns being placed on the oak stock ready to be cut out.  

Selecting the oak for making the frame and also the wood to make up the laminated oak beams for the fore deck of Mai Star II

Image
Having looked through the pile of oak beside the grey shed, we found the two planks that fitted the shape and size we needed to make both the two new deck beams. So it was time to laid out the plywood patterns on the oak to see how best to use the grain pattern to keep the strength in the cut sections of the oak. The deck beam is going to using the plank behind the frame stock. That plank will be cut into thinner strips and then glued together with West Epoxy on a beam jig which is going to be made up shortly. These are pieces are going to be cut up using a panel saw before being cut out to shape with the bandsaw in the workshop.  

Making a plywood pattern of the port side frame that needs replacing because of it poor condition.

Image
The first job was to screw the old frame back together and then get a piece of thin plywood to make a pattern to use to gauge how much the hull shape as changed and if just needs shoring up to get it back in position. The first plywood pattern is the complete length of the original frame, then it as to be cut into sections to make the double width frame. The front part of the frame will be in two sections and aft section will be in three section with a good length of overlap. The joints in centre section will be well spaced apart so that the frame will have plenty of strength in it when it is fixed together with wooden pegs and wedges and red lead paint and sealant.  The lower end of the frame All the sections of frame patterns set out ready to cut out of the oak  on the pile outside in the yard.

Making patterns of the two foredeck lodging knees and inspecting the deck bems to see which of them can be salvaged and which need remaking.

Image
Making plywood patterns of the to foredeck lodging knees which are on either side of the deck beam which holds the samson post deck plate Having sorted out the deck beams from the other deck bits it was time to inspect which can be salvaged and which will need to be remade using laminated oak to make up the new deck beams. Many of the deck beams are in reasonable condition. while others are a mess with bits missing off the ends and others rotten in place. The deck beam in the middle is completely shot and the only thing that can be used for is a pattern. The other deck parts such as carlins and coamings are under bench until we get round to making new bits later. All the varnished parts are under a cover until we are ready to work on them.  

Sorting out the Grey Shed / Workshop and putting more chocks under the hull to make it more stable to work on the boat

Image
Put more chocks under the hull and put the original chocks further forward to stop the hull from twisting.  Just got to tie the chocks together to make sure they do not move out when working on the boat. Got some thin plywood in the back of the boat to make patterns of the parts we need to make as we go along with the restoration.  A large pile of patterning plywood this will soon be turned into patterns for the parts we need to make on the work benches down each side of the boat. This work bench needs sorting out so we can make up new parts to go into the boat as we progress on the restoration. These are all the teak floorboard out of Chance that need to go back in her over the next few weeks when we have time to go over to her and get them out of our Mai Star II restoration shed/workshop. There is another pile in the workshop of the other floorboards which are not teak and were in parts of the interior which were covered with other material.  

Plans for Mai Star II over the next few months as we move into the Autumn and Winter.

Image
The first job will be to put the frame and ribs missing in the port bow area and put the shape back into that part of the hull.  Then replace all the top sections of the frames where they are missing and finish remove the rest of the copper nails from the top of the ribs and frames  and replace the breasthook which is in need of replacing because of rot  and parts are missing. Going to laminate a new oak breasthook.     Many of the top  sections of the frames are in much the same condition and the rest of the frames are in reasonability good condition so they do not need replacing.   The main frames that are in poor condition are where the chain plates were bolted through the frames and the old iron bolts caused the frames to get into such a poor condition and these are the ones that need the most parts replacing.  

Now we are back to the bare hull and all the paint removed from the hull , we can start the rebuilding of Mai Star II.

Image
Now the hull is bare and there is nothing in the way of working on the hull it is time to make plans to start the rebuild of the frames and ribs of the hull. One of the first jobs is to replace the missing frame and the five ribs in the port side forward and get the strength back in the hull and stop it from dis-taunting the hull shape. The other major job to do is replace the top sections of the frames which have got rotten and broken off over the years. Another job is to repair the beam shelf and block the spaces between the beam shelf and strengthen it up and fix it back in position. A major job I am not looking forward to, as it has been a number of years since I tackled this job. This is the other job I am not looking forward either.